Sunday, February 28, 2016

Create a Linked Server MySql to SQL SERVER

While working on one of the projects,i came across a scenario where i have a database that client was having and it was provided by some other provider through their application.I have to get data from that database and using that data i had to do some calculations on that and store the results in my database.There were two scenarios in this case:
1)i get all the required tables and data from that database and create my own database and dump those details into mine and then use it.
2)Create a link between my database and the existing database,so that i can fire queries directly on that database.
Using first approach will not give me updated records at any point of time but my scenario was realtime data.So i thought of using second approach.This approach gave me realtime data as i was querying the existing data and using it.But there is one drawback that it might be somewhat slow.
In this article i will explain how to create a linked server in Sql Server.Here i will be using ODBC Driver to fetch data from MYSQL database.Following are the steps to connect a MYSQL database to a SQL Server: First of all we need to install appropriate MYSQL Odbc Driver based on the operating system from the below link .After the driver has been installed Go To Control Panel->Administrative Tools ->Data Sources(ODBC)->System DSN.Now Press Add Button .

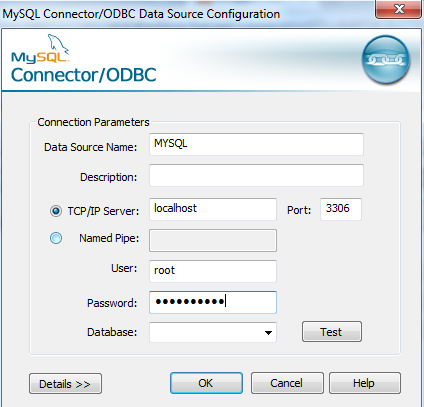
Select MYSQL Driver Listed(MYSQL(ODBC) 5.3 ANSI Driver) and click finish. This will open up MYSQL Configuration Window.Fill Data Source Name as MYSQL(this can be anything).TCP/IP Server as localhost.Port as 3306(default port for mysql),User Name-root,Password -your database password and click test.This will show up a success message.Now Select database and click Ok. 
.
We are done with MYSQL System DSN,Now we will Linked Server to MYSQL in SQL Server.Open Sql Server->Server Objects->Linked Server.Right Click on Linked Servers->Add New Linked Server.


This will Open up a Linked Server Properties Dialog.Fill Linked Server as MYSQL_LINKED,Select Provider as Microsoft OLEDB Provider For ODBC Drivers.Product Name as MySQl,DataSource as MySQL_Linked(whatever name is given while creating DSN).Provider String as-
DRIVER=(MySQL ODBC 5.2 ANSI Driver);SERVER=localhost;PORT=3306;DATABASE=databasename; USER=username;PASSWORD=password;OPTION=3;
Leave location as blank and Catalog as database name (in mysql).

Drill down to Server Object → Linked Servers → Providers, right-click MSDASQL, and select “Properties”. The Provider Options for Microsoft OLE DB Provider for ODBC Drivers dialog box will open allowing you to configure several options. Ensure the following four options are checked: Nested queries
Level zero only
Allow inprocess
Supports ‘Like’ Operator
All other options should be unchecked. When done, click “OK”.

In addition to this, you can enable provider options on the SQLOLEDB, In my case I select the Dynamic Parameter and Allow inprocess.
We are done with setting up a linked server.Now we have to test it by firing some basic queries.There are 3 ways by which we can query a linked server.
1)Open Query.
2)Select using 4 part notation. 

3)Execute Function. 
Open Query function requires 2 parameters 1)Linked Server Name,2)Query
select * from openquery (MYSQL_LINKED, 'select * from test.user_details'); INSERT OPENQUERY (MYSQL_LINKED, 'select name,address from test.user_details') VALUES ('Rajeev','Bangalore'); UPDATE OPENQUERY (MYSQL_LINKED, 'select name from test.user_details WHERE user_id = 100006413534648') SET name = 'Akash'; DELETE OPENQUERY (MYSQL_LINKED, 'select name from test.user_details WHERE user_id = 100006413534648')
Note:-For Update/Delete on Linked Server we need to set RPC and RPC OUT properties of Linked Server as true(Right Click Linked Server->Properties->Server Option Tab->RPC-True,RPC OUT -True.
4 Part Notation  -We can also execute queries on linked server using 4 part notations like:
SELECT * FROM linkedserver...tablename but for this we need to change MSDASQL Provider property->Check the box that says “level zero only” in providers.

select * from MYSQL_LINKED...user_details INSERT into MYSQL_LINKED...user_details(name,address) VALUES ('Rajeev','Bangalore'); UPDATE MYSQL_LINKED...user_details set name='Akash' where USER_ID='100006413534649'; DELETE from MYSQL_LINKED...user_details where USER_ID='100006413534649';
Execute Function can also be used for querying linked server.
EXECUTE('delete from test.user_details WHERE user_id = 100006413534647') AT MYSQL_LINKED

Saturday, February 6, 2016

Triggers In Sql Server

Trigger is a special kind of stored procedure that executes in response to certain actions on the table like insertion,updation and deletion. There are 2 types of triggers:- 1)After Triggers(for triggers). 2)Instead Of Triggers. After Trigger:-After trigger are further classified into 3 types:- a)After Insert:-Fired after insert operation is performed on the table. b)After Update:Fired after update operation is performed on the table. c)After Delete:Fired when a record is deleted from a table. Now we will see the triggers in action from a small example.For this we will first create 2 tables.
CREATE TABLE [dbo].[Blogs]( [blog_id] [int] IDENTITY(1,1) NOT NULL, [blog_title] [varchar](max) NOT NULL, [blog_date] [date] NOT NULL, [blog_description] [varchar](max) NOT NULL, [blog_tags] [varchar](max) NOT NULL, [status] [bit] NULL, [blog_url] [varchar](max) NULL, CONSTRAINT [PK_Blogs] PRIMARY KEY ) GO CREATE TABLE [dbo].[Blog_tag]( [Blog_id] [int] NOT NULL, [Tag_id] [int] NOT NULL ) ON [PRIMARY] GO CREATE TABLE [dbo].[Tags]( [Tags_id] [int] IDENTITY(1,1) NOT NULL, [Tag_name] [varchar](50) NOT NULL, CONSTRAINT [PK_Tags] PRIMARY KEY ) GO
Now i am going to insert a record in tags table that can be used in trigger.
INSERT INTO [dbo].[Tags] ([Tag_name]) VALUES ('Sql Server') GO
After the new record has been inserted in the tags table .We shall create a trigger on the blogs table that will automatically insert the record in Blog_Tag table.
Create trigger [dbo].[trgAfterInsert] on [dbo].[Blogs] After Insert As declare @blog_id int; declare @tag_id int; declare @tagname varchar(50); select @blog_id=i.blog_id from inserted i; select @tagname=i.blog_tags from inserted i; select @tag_id=Tags_id from Tags where Tag_name=@tagname; Insert into Blog_tag(Blog_id,Tag_id) values(@blog_id,@tag_id);
Now try to insert a record in blogs table ,it will automatically insert record into Blog_tag table.
INSERT INTO [dbo].[Blogs] ([blog_title] ,[blog_date] ,[blog_description] ,[blog_tags] ,[status] ,[blog_url]) VALUES ('Test' ,'2016-02-06' ,'Test Description' ,'Sql Server' ,0 ,'test url') GO
Similarly we can use after update and after delete trigger. Note:-For after update/delete trigger small change is there in syntax.
Create trigger [dbo].[trgAfterUpdate] on [dbo].[Blogs] After Update As declare @blog_id int; declare @tagname varchar(50); declare @tag_id int; select @blog_id=i.blog_id from inserted i; select @tagname=i.blog_tags from inserted i; select @tag_id=Tags_id from Tags where Tag_name=@tagname; print @tagname; Update Blog_tag set Tag_id=@tag_id where Blog_id=@blog_id;
Similarly we will see for delete also.
Create trigger [dbo].[trgAfterDelete] on [dbo].[Blogs] After Delete As declare @blog_id int; select @blog_id=i.blog_id from deleted i; delete from Blog_tag where Blog_id=@blog_id;
You can clearly view the difference in delete trigger we are using from deleted i instead of inserted i.
Instead of Trigger:-These are used when we want to check certain conditions before performing insert,update or delete on a table.These are further classified into 3 types:-
 a)Instead of Insert:-These will fire when we will insert a record in a table and will perform the specified query instead of insert.
 b)Instead of Update:-These will fire when we will insert a record in a table and will perform the specified query instead of update.
 c)Instead of delete:-These will fire when we will insert a record in a table and will perform the specified query instead of delete. Now i will show how to create instead of delete trigger.
Create trigger [dbo].[trgInsteadDelete] on [dbo].[Blogs] instead of Delete As declare @blog_id int; declare @tag_id int; select @blog_id=i.blog_id from deleted i; select @tag_id=Tag_id from Blog_tag where Blog_id=@blog_id begin if(@tag_id is null) begin rollback; end else begin delete from Blog_tag where Blog_id=@blog_id; end end

Friday, February 5, 2016

Views in Sql Server

View are virtual tables that are compiled at runtime.Data associated with the views are not physically stored in view,they are present in base tables.In Sql Server we create view for security purpose as it restricts user to view columns actually present in the base tables.In Sql Servre we can create a view using following syntax-
CREATE VIEW [dbo].[View_Employee] AS SELECT Emp_ID, Emp_name, Emp_Sal FROM dbo.Employee GO
Sql Server has 2 types of views.There are 2 types of views in sql server. 
1)System Defined Views:-These views are predefined views present in master database.They are further classified into 3- 
a)Information Schema View:-In Sql Server we have around 20 Information Schema View used to display information for database like tables and columns.eg-Information_Schema.Tables,Information_Schema.columns. b)Catalog View :-These were introduced in sql server 2005 and used to show self describing information.eg-Sys.Tables. 
c)Dynamic Management View:-These were also introduced in Sql server2005.Thses view give administrative information of database current state.

2)User Defined Views:-These Views are defined by users.They are of 2 types:- a)Simple View:-When we create a view on single table then it is called simple view.eg-
CREATE VIEW [dbo].[View_Employee] AS SELECT Emp_ID, Emp_name, Emp_Sal FROM dbo.Employee
b)Complex View:-When we create a view on more than one table then it is called a complex view.eg-
CREATE VIEW [dbo].[View_CompleteUser_Details] AS SELECT dbo.tblUserLogins.sno, dbo.Employee.Emp_ID, dbo.tblUserLogins.username, dbo.tblUserLogins.password, dbo.Employee.Emp_name, dbo.Employee.Emp_Sal FROM dbo.tblUserLogins CROSS JOIN dbo.Employee GO
Note:-
1)We can insert ,update and delete data from simple view only when we have primary key and all not null fields are in view.
 2)We can not insert/delete data in complex view we can only update it.

Saturday, January 23, 2016

Passing a table to a stored procedure in sql server using table valued parameters

Many times we come across a situation where we need to pass a table to stored procedure from c# code.In such scenarios what we can do is either loop through table and send rows one by one or we can directly pass the full table to the procedure.Passing rows one by one may be inefficient as we have to iterate through rows and call procedure again and again. Sql Server provides us an efficient way of doing the same using 'User Defined Types' So for passing a table valued parameter to a stored procedure we need to create a user defined table type that will have same columns that we want to pass to the table. Database Node > Programmability > Types > User-Defined Table Types Now we create a table which will be filled by stored procedure.
CREATE TABLE [dbo].[Employee]( [Emp_ID] [int] IDENTITY(1,1) NOT NULL, [Emp_name] [varchar](100) NULL, [Emp_Sal] [decimal](10, 2) NULL ) ON [PRIMARY] GO
Once the table is being created we need to create a type same as that of a table.
CREATE TYPE Employee AS TABLE ( [Emp_ID] [int] IDENTITY(1,1) NOT NULL, [Emp_name] [varchar](100) NULL, [Emp_Sal] [decimal](10, 2) NULL ) GO
Now we are done with creating a type and a table we need to create a stored procedure that will accept a type and insert int the table using the type.
CREATE PROCEDURE sp_InsertEmployee @employees employee READONLY AS INSERT INTO Employee(Emp_name,Emp_Sal) SELECT Emp_name,Emp_Sal FROM @employees
Where @employees is a table valued parameter passed to the stored procedure . Now we are done with creating a procedure ,its time to check how it works.You can pass a datatable from C# or VB Code as a parameter.What i will do here as a demonstration i will create a table variable and pass that table to the stored procedure .
DECLARE @testtable employee INSERT INTO @testtable(Emp_name,Emp_Sal) VALUES ('Anees', 1000.00), ('Rick', 1200.00), ('John', 1100.00) select * from @testtable
Now we have our table ready we need to pass it to stored procedure and see the result.
DECLARE @testtable employee INSERT INTO @testtable(Emp_name,Emp_Sal) VALUES ('Anees', 1000.00), ('Rick', 1200.00), ('John', 1100.00) exec sp_InsertEmployee @testtable select * from Employee

Sunday, January 3, 2016

Read data from Excel file(xls,xlsx,csv) in Asp.net MVC

In this article, we will see how to display data from an Excel spreadsheet(xlx,xlsx,csv) using ASP.NET MVC. We will connect to a Microsoft Excel workbook using the OLEDB.NET data provider, extract data and then display the data in a View.
First of all we will create a ImportExcel in Home Controller which returns a View.This method will return a View for Get Request. Now we will create another method ImportExcel1 and decorate it with [HttpPost] Attribute.Since in MVC 2 Methods cannot have same method name,we can call 2 actions using Action Name attribute .So we will decorate ImportExcel1 with [ActionName("Importexcel")]. Now if we make a get request then ImportExcel will be called and for post request ImportExcel1 will be called.Below is the code to read excel files.
using System; using System.Collections.Generic; using System.Data; using System.Data.OleDb; using System.IO; using System.Linq; using System.Web; using System.Web.Mvc; using ExcelUpload.Models; namespace ExcelUpload.Controllers { public class HomeController : Controller { public ActionResult ImportExcel() { return View(); } [ActionName("Importexcel")] [HttpPost] public ActionResult Importexcel1() { if (Request.Files["FileUpload1"].ContentLength > 0) { string extension = System.IO.Path.GetExtension(Request.Files["FileUpload1"].FileName).ToLower(); string query = null; string connString = ""; string[] validFileTypes = { ".xls", ".xlsx", ".csv" }; string path1 = string.Format("{0}/{1}", Server.MapPath("~/Content/Uploads"), Request.Files["FileUpload1"].FileName); if (!Directory.Exists(path1)) { Directory.CreateDirectory(Server.MapPath("~/Content/Uploads")); } if (validFileTypes.Contains(extension)) { if (System.IO.File.Exists(path1)) { System.IO.File.Delete(path1); } Request.Files["FileUpload1"].SaveAs(path1); if(extension==".csv") { DataTable dt= Utility.ConvertCSVtoDataTable(path1); ViewBag.Data = dt; } //Connection String to Excel Workbook else if (extension.Trim() == ".xls") { connString = "Provider=Microsoft.Jet.OLEDB.4.0;Data Source=" + path1 + ";Extended Properties=\"Excel 8.0;HDR=Yes;IMEX=2\""; DataTable dt = Utility.ConvertXSLXtoDataTable(path1,connString); ViewBag.Data = dt; } else if (extension.Trim() == ".xlsx") { connString = "Provider=Microsoft.ACE.OLEDB.12.0;Data Source=" + path1 + ";Extended Properties=\"Excel 12.0;HDR=Yes;IMEX=2\""; DataTable dt = Utility.ConvertXSLXtoDataTable(path1, connString); ViewBag.Data = dt; } } else { ViewBag.Error = "Please Upload Files in .xls, .xlsx or .csv format"; } } return View(); } } }
Here we have created a static class Utility ,which contains 2 methods ConvertCSVtoDataTable and ConvertXSLXtoDataTable.Below is the code for Utility class.
using System; using System.Collections.Generic; using System.ComponentModel; using System.Data; using System.Data.SqlClient; using System.IO; using System.Linq; using System.Web; using System.Data.OleDb; namespace ExcelUpload.Models { public static class Utility { public static DataTable ConvertCSVtoDataTable(string strFilePath) { DataTable dt = new DataTable(); using (StreamReader sr = new StreamReader(strFilePath)) { string[] headers = sr.ReadLine().Split(','); foreach (string header in headers) { dt.Columns.Add(header); } while (!sr.EndOfStream) { string[] rows = sr.ReadLine().Split(','); if (rows.Length > 1) { DataRow dr = dt.NewRow(); for (int i = 0; i < headers.Length; i++) { dr[i] = rows[i].Trim(); } dt.Rows.Add(dr); } } } return dt; } public static DataTable ConvertXSLXtoDataTable(string strFilePath,string connString) { OleDbConnection oledbConn = new OleDbConnection(connString); DataTable dt=new DataTable(); try { oledbConn.Open(); OleDbCommand cmd = new OleDbCommand("SELECT * FROM [Sheet1$]", oledbConn); OleDbDataAdapter oleda = new OleDbDataAdapter(); oleda.SelectCommand = cmd; DataSet ds = new DataSet(); oleda.Fill(ds); dt= ds.Tables[0]; } catch { } finally { oledbConn.Close(); } return dt; } } }
Now we will create a view that contains file upload control and a button.When a request for ImportExcel of Home Controller is made,we will show file upload control with button control.When we select a file and press button it will make a post request to Home Controller and ImportExcel1 method will be called.Below is the Razor View for both request.
@using System.Data; @{ ViewBag.Title = "ImportExcel"; Layout = "~/Views/Shared/_Layout.cshtml"; } <h2>ImportExcel</h2> <!--[if !IE]><!--> <style type="text/css"> /* Generic Styling, for Desktops/Laptops */ table { width: 100%; border-collapse: collapse; } /* Zebra striping */ tr:nth-of-type(odd) { background: #eee; } th { background: #333; color: white; font-weight: bold; } td, th { padding: 6px; border: 1px solid #ccc; text-align: left; } /* Max width before this PARTICULAR table gets nasty This query will take effect for any screen smaller than 760px and also iPads specifically. */ @@media only screen and (max-width: 760px), (min-device-width: 768px) and (max-device-width: 1024px) { /* Force table to not be like tables anymore */ table, thead, tbody, th, td, tr { display: block; } /* Hide table headers (but not display: none;, for accessibility) */ thead tr { position: absolute; top: -9999px; left: -9999px; } tr { border: 1px solid #ccc; } td { /* Behave like a "row" */ border: none; border-bottom: 1px solid #eee; position: relative; padding-left: 50%; } td:before { /* Now like a table header */ position: absolute; /* Top/left values mimic padding */ top: 6px; left: 6px; width: 45%; padding-right: 10px; white-space: nowrap; } /* Label the data */ td:before { content: attr(data-title); } } </style> <!--<![endif]--> @using (Html.BeginForm("ImportExcel","Home",FormMethod.Post,new { enctype = "multipart/form-data" } )) { <table> <tr><td>Excel file</td><td><input type="file" id="FileUpload1" name="FileUpload1" /></td></tr> <tr><td></td><td><input type="submit" id="Submit" name="Submit" value="Submit" /></td></tr> </table> } <div> <table id=""> @if (ViewBag.Data != null) { <thead> @foreach (DataColumn column in (ViewBag.Data as System.Data.DataTable).Columns) { <th>@column.ColumnName.ToUpper()</th> } </thead> if ((ViewBag.Data as System.Data.DataTable).Rows.Count > 0) { foreach (DataRow dr in (ViewBag.Data as System.Data.DataTable).Rows) { <tr> @foreach (DataColumn column in (ViewBag.Data as System.Data.DataTable).Columns) { <td data-title='@column.ColumnName'> @dr[column].ToString()&nbsp; </td> } </tr> } } else { int count = (ViewBag.Data as System.Data.DataTable).Columns.Count; <tr> <td colspan='@count' style="color:red;" > No Data Found. </td> </tr> } } else { if (ViewBag.Error != null) { <tr> <td style = "color:red;" > @(ViewBag.Error != null ? ViewBag.Error.ToString() : "") </td > </tr > } } </table> </div>

Wednesday, August 12, 2015

Ajax Toolkit Script Manager Slows down website

Many times when we develop asp.net web applications and use some ajax controls(like calender extender,mask editor,etc),we may notice that the performance of our website goes down.
If you go to the network tab of browser and see the files that are being requested,you will notice a large number of .axd files are being downloaded.The latest version of Ajax Control toolkit is loading all the scripts.This will end up in slowing your application . Scripts and images downloaded from the WebResources.axd handler are not cached. To overcome this issue we need to append our script manager tag with ScriptMode="Release" tag.
Now what will this tag do is the obvious question.

The answer is that the Scripts and images downloaded from the WebResources.axd handler are cached now.

<ajaxtoolkit:toolkitscriptmanager runat="server" scriptmode="Release"></ajaxtoolkit:toolkitscriptmanager>

Saturday, August 8, 2015

Randomly select rows from a datatable in c#

Sometimes we need to show some random rows from a datatable in c#.For achieving this we can use Random Class which is present in base class library and create a random number .Now we use this random number to order datatable.Here is the code snippet for the same.
var rand = new Random(); var employees = employee.AsEnumerable().OrderBy(r => rand.Next());
Further we can select limited number of rows by slightly modifying the above syntax.
var rand = new Random(); var employees = employee.AsEnumerable().OrderBy(r => rand.Next()).Take(10);
Take method will select number of rows specified as parameter